The New Header

The New Header

Sunday, 14 July 2013

A Day Complete...

Before I start on the Autocross stuff I have a little story to tell.  So kids, sit around and let me tell you a story about one of your Uncle Travis' days that were fully complete, back in 2013.

I'm sure everyone has had a day that was made complete by something.  A moment that you think to yourself, "Yup, My day can end now, and I would be content."  Whether it's from finishing a marathon, having the greatest night sleep(which in that case your day was over before it started), eating a record number of pickles in one sitting (which might force you to end your day), or in my case talking crap with my all time favourite driver, Randy Pobst.

For anyone who does not know who Randy Pobst is, be ashamed because he is one of the driver's for KPax Racing in the Pirelli World Challenge. 

I've been following Randy for a very long time now.  Before there was a Pirelli World Series, and before he was part of KPax Racing.

Randy started as an Autocrosser.  He wasn't a young gun either.  He started racing later in his life.  This is exactly why I follow him.  He started it all at a completely grassroots level, with not a tonne of money.  He was just a guy who raced for the thrill of racing.  He just so happened to be one kickin' racer.  And what comes through when he speaks still is that he races for the shear thrill of it.  Sure he's got to make money doing it, but really he is still enthusiastic about racing on all levels from autocrossing to pro driving in a GT car.

When I was talking to him, we barely touched on racing.  Granted I was very nervous with him because let's be honest, this is Randy Pobst, the equivalent to my wife having dinner with Blue Rodeo.  My wife adores Blue Rodeo a lot.

Our conversation was more about silly things, like how his girlfriend noticed the sign when they came into Toronto that said, "Welcome to Toronto where our mayor smokes crack".  He asked, "What's up with that?"  We never once touched on the KPax Racing Volvos, how could we when we had all the politics of Toronto to talk about..

What really was the DEFINING MOMENT, was how he was so vigourously and animatedly  talking about some sort of midievel torture device (I'm not going to get in why we were talking about that) and his girlfriend leans into him, slowly puts her mouth closer to Randy's face and quietly said,"Randy, there are kid's over there, be quiet."

That one seemingly small moment really showed me that Randy, even though he may be a racing god to me, and the person who really defines what racing should be about, is after all, just like me.  Saying stupid shit, rambling, and sometimes, doing stuff that may not be completely acceptable.  He is, under all those layers of fire retardant clothing and sponsorship decals...a guy.
Randy Pobst's autograh.  I can't say much about this that has not already been said.  He did mention how much he liked the paint marker I gave him to write on the helmet though.

And the cherry on top was when I walked into Mike Skeen's pit looking at the Nissan GTR that is currently in development.  I noticed he was sitting right behind me, with his girlfriend.  Mike is another one of those guys, I've been followin since the advent of Youtube.  This guy knows how to drive, and a lot of what he drives, is crazy cool loud.  CHECK THIS OUT!

We talked for a short time, about the series, and about how the development was going with the GTR, and about the Grassroots Motorsports Ultimate Street Car Challenge which is a no holds barred time trial event with cars that range from $500 Le Mons cars to ultra exotic Nascar engined Tube framed purpose built racers.

At the end of it all, I reached into my helmet bag and his girlfriend said,"I told you it was a helmet".

When I apologized that he was not the first to sign it, and Randy was the first, his girlfriend and him looked at me with a "How dare you!" kind of look.  Jokingly of course, but there seemed to be a little bit of a beyond cempetitiveness aura that fell on the place and as Mike signed my helmet his girlfriend stated,"We have a love hate relationship with Randy." Hmmmm, what does that mean?
Mike Skeen's smudged autograph.  I put the helmet into my bag before it was completely dry. DAMN!

But really the experience was amazing, and as I walked around a little more waiting for my wife to join up with me, since she had to walk the dog, to watch the Touring Cars, and B-Spec Racers, I was thinking to myself that my day could end then, because, those two moments with Randy and Mike completed my day as everyday I wish could be concluded.

You know what?  I no longer want to talk about my race too much since right now all I hear is race cars going around the CNE grounds for the Indy.  Sounds like USF2000 cars right now, and the sound just reminds me of yesterday, the day that my day was fully complete.

But just to be fair, my last race was a nailbiter.  It was a technical course, with a few very slow 90 degree turns.  Nice for the Sentra's 2.5 engine with a lot of torque.  Bad for the driver who did not have enough runs to work on all the areas that needed improvement.

It wasn't until the 3rd run of the day that I started to improve my times, and from then on I didn't clobber any cones either.  I think my first and second run did enough killing of cones.

After my 4th run I jumped from 8th in class to 2nd, where I stayed until the very last run.  I was not racing that run because I was out marshalling, picking up cones, and waving flags.  So basically my day was done and I still had one competitor in my class that was hot on my heels.  Well, to make a long story short, he eeked out a 0.015 second lead ahead of me to clinch 2nd in class.  It was a fraction of a second but that's autocross for you. 

Here is the video of my last run that improved my times by about a quarter of a second.  I was still 2nd place at this time.  I definitely did not the best line and I can see where I could have made up another second. Run#5 July62013

At the end of that rough day, in blistering heat, and dust blown surroundings, I held onto 3rd in class.  The official results are still not up.  I'm still getting good points for that so hopefully the next few races I can improve my position.

Until next time, try and have one of those days where it's concluded conclusively.

Tuesday, 2 July 2013

2013 Race Season Update

The 2013 PITL race season has moved into full gear.  After missing the first race because of scheduling conflicts, my first race was actually the second race in the series on May 25.    The results were mediocre. 5th in class, and 37th overall out of 92.

Like all racers, I had copious amounts of excuses.
1. Had to shake of the winter rust off.
2. Trying new R-Comp tires.  Hankook z214's which are much different than the R888 or RA1 which I have been on that last 2 seasons.
3. New suspension setup with the traction spacers.

I was so excited for the first race of the season, I actually forgot to torque down the lugs of one of my wheels so after the first run I heard a very loud clunking.  After driving slowly around the paddock while a number of people were listening trying to narrow down where it was coming from, I jacked up the corner and immediately felt that my rear right wheel was loose.  Slapping my forhead, and calling myself a number of names, I got back into the game, only to find out that I had so much oversteer, it felt like my rear end was on ice.  Literally, I was fighting it the entire second run, drifting the back around like I was on Fast and the Furious, Tokyo Drift.

After adjusting the tire pressures I fixed the oversteer issue, but I was too far behind to really catch up to the leaders, since I had basically thrown away my 2 first runs.  Such is life.

Before my June 23rd race, I ended up fabricating up a new camera mount for my video camera.  I used the Go Pro suction mount, and made an adapter to fit my tiny camera.  I don't have a Go Pro camera so I had to build this adaptor out of 0.063 alluminum sheet.  The camera is friction fit into the holder so it won't go anywhere.


A small cutout was created so I didn't have to take the camera out when I upload video to the computer with the cable.

The June 23rd race would be the test for the new adapter and camera and it worked out really well.  I still have to learn the Youtube interface fully, and I still need to learn the compositer program, but the test video worked out well.  I'll be uploading more videos as the season progresses to my Youtube Channel, Twinchracing.  Hope people enjoy it.

As for the race it was an improvement.  I think I've gotten rid of the winter rust, and I've started to get used to the Z214's.  I'm still having a little bit of oversteer, so I'm going to need to play with tire pressures further.  Here are the results. 3rd in class, and 20th out of 82 overall.  It was definately one of my favourite track setups yet, with a great long sweeping right had turn that really created some g-forces as you accelerated through it. FUUUUUUUUN!

Till next time.

Friday, 10 May 2013

2013 PITL Race Season Prep.


It's been a few months since my last post, but I swear there were legitimate reasons.  No, the dog didn't eat my computer, but I did trip over a cord and knocked it over and killed the hardrive. 

So, basically because of this I lost the last revision of the E-Crosser making it a bit difficult to continue building the model without the digital "blueprint".  I've been working on that since.

Since I don't have much to say about the E-Crosser, I might as well tell you about the preparations for the 2013 PITL race series.

When changing the tires last year I noticed that my front Stainless steel braided brake lines were starting to fray.  I guess after almost ten years of wear and tear it's bound to happen so I changed out my fronts with brand new, shiny brake lines by Goodridge.

I also got to use my Motive Power Bleeder, one of the greatest inventions for fluid transfers, particularly on closed pressurized systems...like brakes.  The system uses a reservoir that is filled with the brake fluid.  In this case,  Stoptech STR-600 High Performance Brake Fluid.  The Power Bleeder reservoir is pressurized to about 15 psi by a manual pump. The reservoir is sealed to the brake fluid reservoir on the car with a tight rubber seal to keep the circuit of the brake system pressurized.  Because of the pressure all you have to do is open up each brake caliper's bleeder valve(in proper order of course) and let the Power Bleeder force the fluid through until you see no bubbles. 

The only thing to really monitor is for any seal leaks, because we all know what brake fluid does to paint, and also to keep the pressure up so the fluid is constantly being forced out while making sure the reservoir in the Power Bleeder does not go empty.  Forcing air into the system is the complete opposite thing you ever want in the braking system. Duh.

Braided Stainless is always the prettiest.
Also, last year on one of the roughest parking lots I've ever been on, I hit a ripple in the concrete that was so deep that it lifted suspension enough to lift the springs away from the lower spring perch of my Ground Control Coilover Sleeves. When the car came back down to Earth, the spring was no longer centered in the perch and it sheared away part of it from the threading of the sleeve. 

I always knew this was a possibility since whenever I jacked the car up the springs came away from the perch, but I had no idea I would hit such a massive rut in the concrete.  This year I decided to pony up a few bones and get some helper springs from Eibach to just keep things in place when the the suspension was at full droop from doing a Dukes of Hazard car jump.

I just took out the car today for a spin and I think I will have to lower the front coilovers about a centimetre. The helper springs have raised it a little less than a centimetre when they are fully compressed, and that rake I had last year to fight weight transfer going to the rear wheels is now gone.

Also, I was a still hungry for a bit more oversteer.  Aren't we all though?  I knew I would like a bit more castor, but the Nissan has zero adjustability in that department, so I took to the World-Wide-Webs and discovered that you can increase positive castor by a simple spacer placed under the rear control arm mounting bracket.  This pushes the rear bracket away from the bottom of the car, which in turn increases the angle of the control arms slightly giving a degree of positive castor.

Positive castor affects steering by helping to keep the wheels straight at speed, but more importantly for me, it adds some more negative camber when the wheels turn.

I traced the rear control arm mounting holes, and created a mount shape exactly to fit with the rear control arm bracket.  I then built a Solidworks model for the new spacer.  It would be cnc'd out of 10mm aluminum.  A friend of mine has access to a cnc machine, so he was kind enough to do his thing, and cut out 4 spacers for me.  Awesome guy.  The spacers cost me a total of  dollars for the raw material, and about an hour total for the design process.

We'll see on May 25th how effective this change is

Another nice and shiny thing to just get all dirty.
Also, I noticed that my almost 10 year old Energy Suspension Motor Mount Inserts were starting to fail.  The front ones were constantly popping out of the OE Motor Mount so on launches I was getting some serious wheel hop again, just like when the car was brand new.

I ended up recruiting the help of my good friend and mechanic Wayne Yeates from Way's Performance Services to make some new solid motor mounts.  I've said it once, I've said it twice, this guy is insane when it comes to the details.  I brought him over some used motor mounts and he pressed out the old ones, cleaned them up, and started to create an alluminum jig to hold the mounts proper and tight keeping the metal centre sleeves in the proper orientation when the liquid urethane is poured into the mount. 

To get even crazier he noticed that Nissan had made the motor mount bushings so the centre sleeve was actually not centred at all but rather offset from the centre slightly.  He took that into account while making his aluminum jig.

The urethane I decided to use for the solid motor mounts was ITW Devcon Flexane 94 Liquid.  This stuff cures hard, but still has some flex.  If vibration annoys you, then do not use the 94, use either the Flexane 80 or Flexane 60.  In the winter I will be changing these mounts out for my old ones because I don't want to risk the solid mounts cracking in the cold.

Front Mount.  It's so solid!
Rear Mount
Next, my wife wanted the moon roof to work again.  About 2 years ago the whole assembly that included the map lights, glasses holder, and moonroof toggle switch fell from the ceiling and it no longer sit proper in the mountings since it's basically attached by a clip.  Because I never use the moonroof (have I ever mentioned how much I hate that 50 lbs of wasted of weight at the highest point of the car), I just detached the whole assembly and left a big gaping whole in the interior liner where it once sat, giving me a satisfying view of mechanisms and engineering stuff that usually are hidden.  It was ghetto, but it meant nothing to me.

Well, with a road trip looming this year to Virginia again, and the fact that it may get a bit hot she wanted the moonroof to work.  I figured it would be easier if I fabricated an aluminum bracket to hold the toggle switch only, and not worry about the glasses holder or the map lights.  Those things were useless anyways. 

I made the bracket out of 0.060" aluminum sheet, riveted the toggle switch to it, and drilled a few holes in the metal that the original assembly clipped to, and voila, open sesame, the moonroof works again.


It is not pretty but it is much more solid than the plastic assembly that Nissan supplied attached by a spring clip. It doesn't look all that complex from the pictures but there were some funny angles to bend in order to properly fit the switch and keep it so it was straight in relation to the bracket.

Finally, I decided to go one step further into the R-Compound tire realm, and try out Hankook's Z214 C71 tire. 

I got in touch with someone who had a set of 225/45/15 with 90% of the tread left.  They were such a steal I could not say no, and drove out an hour to get them.  They've been mounted and they are dying to get abused.

Other than a bunch of garage cleaning and organizing too, this off season was a busy one.

Oh, also, the splitter is still going forward, but I've been a bit too busy to worry about what this blog is actually about.

Till next time.


Monday, 28 January 2013

E-Crosser...The Model

And as promised here is the progress so far on the the scale model.    Nothing really to report other than it is still moving forward.

The next thing to build is the new suspension arms.
The Frame

Woody in the Pilot's Seat
 Till next time.

Friday, 25 January 2013

More Updates and New Suspension

Well it's the Rolex 24 Hours of Daytona weekend, so I figured, since I'm online watching the race(or at least I'm looking for a site to watch the streaming of it) I might as well update my progress with the E-Crosser.

There has been a lot of progress with the suspension these past weeks.  I've done a tonne of research on how the control arms will work.  From the standard Sentra suspension (since I know it so well) to F2000, and Formula Ford.  What I chose as my inspiration was a homenade open wheel car, I believe it was a Formula Ford.  The pictures I saw were exactly what I wanted.

It was basically a double A-Arm configuration, but where I changed it up was I am going to use Koni yellows, with ground control coil-overs instead of specific race shocks and springs.  Cost is alwyas an issue so let's stick with the basics.  I am using these because I know them well from the Sentra, and infact I will be using the Sentra's rear combination for both the rear and front of the E-Crosser.  This will allow me to fabricate the same A-Arms for both the front and rear saving time.

Rear Suspension without the wheel
Front Suspension

The Whole thing
I'm really thinking this thing is really looking awesome.  I'm going to have to figure out a few more things such as steering, and how to cover the electrical, because it sometimes rains.  Also, the I have not decided on what spindle to use.  Should I use a Sentra's or fabricate my own...who can say right now.

As for the 1/6 scale model, the main body is almost complete.  I will upload the photos this coming week  I've only stuck my fingers together once with the glue.  I have 911 on speed dial just in case I glue my eyelids.  You never know with me.

Till next time, I'm going to enjoy the 24 Hours of Daytona, and be back early next week with model photos.

Friday, 4 January 2013

The New and Improved Base Frame...

While looking at the last version of the balsa wood frame...oh, let me first say, Happy Christmas everyone, hope your holidays treated you well, and the New Year's came without a hitch.  Go figure the world didn't end when the Mayan calendar switched from one to another.  Gee, everytime I switch my calendar from the past year to the new year I always wonder, will this be the end of the world?  Go figure nothing ever happens.

Anyways, as I was mentioning, I was looking over the last frame and noticed a few things were just not right.  First, the 1/4" balsa I used just looked too thick.  The scale was accurate as it would have been 1 1/2" tubing but I just didn't like the thickness, and in the actual car I am still debating 1" tubing or 1 1/2" tubing. tubing. So decided to go with 3/16" balsa sticks to be an in between.  I like the the look better.  

Secondly, I was not happy with the triangulation of the frame so I redid it, with a much wider stance now for the batteries.  I can now fit more banks of car batteries in case I need more.

The last frame I built I did without using the technique of pinning.  This time around I pinned the frame as one of my co-workers is an avid model maker of model airplanes and he suggested it.  It was so much easier to accomplish what I wanted.

So you wonder what pinning is.  Well here it is.

Since I built this all digitally it was easy to print up a scaled top view frame on paper.  I just printed off the base frame first at 1:6 scale.  I then basically just traced over the printout with the balsa wood sticks, cutting the lengths directly on the printout.  To keep the pieces steady and tight against each other I pinned down lengths of scrap balsa against the frame lengths and glued the frame pieces in place.  To make sure everything was square I used a small set square just for the added piece of mind, because if something was not perfectly square I would end up with a bent frame.

For a better explanation here is the link I used.to learn how to pin properly.PINNING TECHNIQUES.

Here is the new frame.  It certainly looks prettier than the last version.

To give a sense of proportion, here is the frame in place with the driving position in rough place.

I think I will continue doing this during my lunch hour at work.  It is definately a better place to do it with more room, less pets, and less distractions.

Till my next post. 

Saturday, 1 December 2012

Let's get Physical...Physical...


I just wanted to show that progress has begun on the 1/6 scale model that will be the future E-Crosser.

As my scaled assistant is demonstrating, this new frame is full of potential functionality.  It may look rough, but this was the moment that all this time designing and refining has come to something physical.

The front of the car is on the floor.


Enjoy looking at this piece of history. :)

Thursday, 29 November 2012

I'm Famous...Kind of...Not Really.

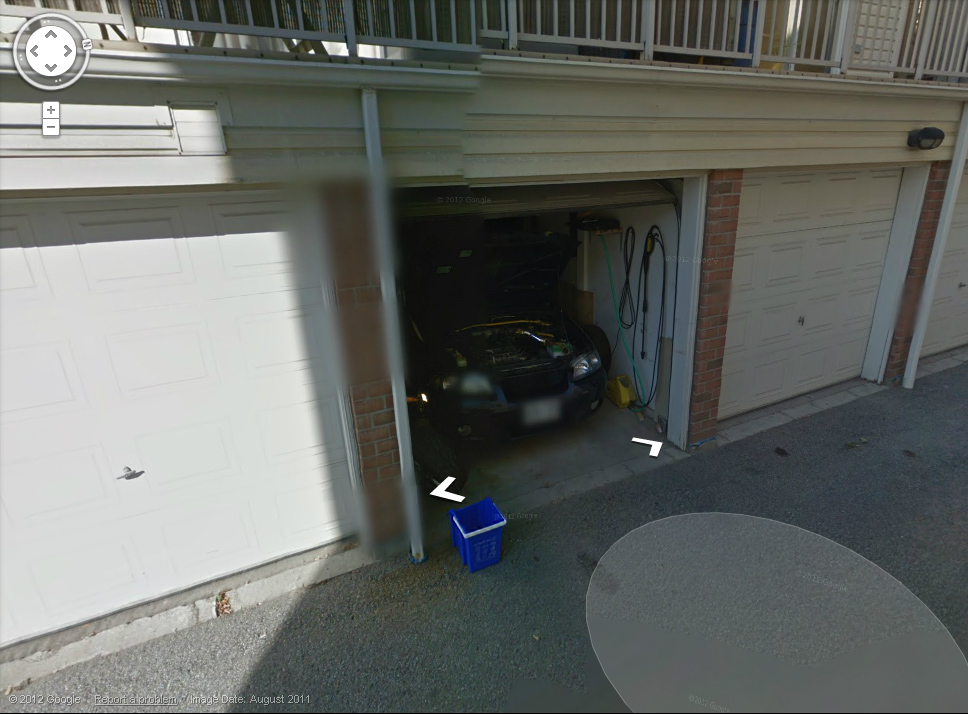
So as the title states I'm not really famous.  The other day I was casually going through Googlestreet View, walking through my neighbourhood when I noticed that there was a new arrow pointing down my driveway.  It's technically not just my driveway since about 50 other people share it to get to all their own garages.

The Google Cameracar must have driven down the driveway thinking it was a street or something and I happened to be working on the Sentra that day.  I never noticed it since I was probably under the car. 


So now you all can see what I have to work in when I do car stuff.  In the back of the garage I have a small work bench with a wall of shelves, and I have about half a metre on either side of the car, give or take a foot depending on how I park the car, to maneuver tools, tires, myself, or what have you.  So doing what I was doing that day was not an easy task.  I was swapping out my front cv joints/halfshafts and outer transmission case seals.  I must have just started because I can see that the passenger tire was off, and I had my light set up looking into the wheelwell getting ready to work on taking the joint out.

Too bad they didn't come a little later.  You would have seen me on the drivers side all sweaty and angry looking trying to get the "bleaping" seal in straight.  Thanks to one of my neighbours for helping with that since he was a mechanic and new a few tricks to get seals in straight.  Canadians sure are friendly to strangers.

As for the E-Crosser, my supplies finally came in a few days ago.  BALSA WOOD and HOT GLUE STICKS!!!  I can get started soon on making this model.

In conclusion, If anyone wants an autograph, send me a cheque for 50 dollars with your name and address. For that price I will write a short note with a photo of my Sentra saying how I love you for being such a huge fan.  This will make a perfect Christmas gift for any of your loved ones.  They will appreciate it for years and years.

Monday, 5 November 2012

This Chair won't Fit!

And so I need to make some frame adjustments.  The race seat I used as a template is about 25" wide at the shoulders and as you can see, things just don't fit.  This width is one of Kirkey's larger width seats.

Let's refine this.

I will have to widen a few points on the frame around the driver's shoulders, as well as widen the area where the batteries sit.  This is fine though because this may allow for more room for more batteries is I need to.

Oh No!  The seat won't fit!

Friday, 26 October 2012

E-Crosser:The Next Generation.

Well, I decided to post preliminary renderings since I have not posted much lately.  The model is rough and is not completely sorted yet so there are still errors but I wanted to show the progress so far of the E-Crosser in a couple of renderings.  One with the sheet metal, and one without.

Again this frame is not optimized yet, and it could be much too heavy.

I'm going to be adding some sheet metal areound the cockpit to deflect any debris that the tires will kick up to protect the batteries and the driver.

The placement of the 4 batteries is sorted out, but since electrical is not my thing...yet...I'm not sure if I will need more to run the E-Crosser for a maximum of 8 hard runs in a raceday.

There are no transaxles here, or a motor.

I've also added 18cm to the wheelbase.

Right now I have not worked out the wings so they are not accurate at all to what they will look like, except for the width.

Also, the suspension has not been weighted so it is riding very high.

Enjoy.

View without the Sheet Metal

View with Sheet Metal


The Race Season is Over, and...

So the race season is complete.  It was a busy year, but I made it through with little grief. The last race I ended up 2nd in class landing me a third in class for the season.  Not bad.

During the winter Wayne Yeates and I will be developing the front splitter for the Sentra, as well as the brake ducting through the front bumper.

But really, the big, big news is, I have recently started developing the E-Crosser further.  New renderings should be available within the week of what I have in mind.

I have decided to build my own suspension rather than using a Miata Suspension. 

"Why?", you might wonder.  Simple, weight, simplicity, and cost.  I will be able to build the suspension parts for a fraction of the weight.  I may still use the Miata's suspension dimensions, however, I am starting to think that I want to be able to build the same control arms for both upper and lower, and use those for all corners of the car.  This would mean that I could build 8 control arms (4 upper, 4 lower) and use the same jig for all of them.  This will be shown in the new renderings.

Also, creating my own suspension allows me to have the frame the way I want it, rather than be forced to use the same geometry used by Mazda.  This also means less measuring of the Miata parts and a lot less cost in materials since I don't need to source out a Miata.

I have placed the order for all my balsa wood and I bought a 1:6 scale pose model so I can get started working on the 1:6 scale model of the E-Crosser.  That is definitely on the agenda for this winter off season.  I am planning to have the model complete by the end of winter.

Anyways, hold on to your goochies, because I'm back on the horse.  OK that makes no sense.

Renderings are coming soon with the next phase of development.

Later

Thursday, 12 July 2012

I've been out of commission...but I'm slowly getting better.

I'm finally getting over a major eye flare-up from the Granular Corneal Dystrophy I have.  This episode all started on Canada Day weekend, and is just now getting settled.  I still have a little discomfort, and a bit of light sensitivity.  I have never had a case this bad in my life, but I'm really hoping that it is completely gone for my race on Saturday, and my week-long stay-vacation starting Monday.

On the Friday before Canada Day I had to replace my O2 sensors in the Sentra, becasue I failed spectacularly on my emissions test. (I did get the conditional pass though so no need to worry about driving illegally without valid plate stickers). Because I have a modified exhaust I need to extend the secondary O2 sensor which means I had to splice it.  Now this was a job and a half since finding steel wire is not so simple.  I have about 4 other O2 sensors so I made the lengths out of multiple pieces, and crimped them with wire couplers.  Long story short, I had to wait until my eyes were clear enough to finish the job, so the Sentra was on jack stands for a good week and a half before I could get to finishing the job. 

The final front bumper splitter has been pulled and this thing looks amazing!  Granted I could only get white textured ABS but I really don't care.  I'll post some pics of it.  Now I have to build the support rods, and Wayne Yeates of Way's Performance Services will build the undertray out of alluminum sheet.  I think this won't be ready by the end of the race season, but it'll be ready for the 2013 season.  I can't wait to get that sorted and test it out.

Next thing to deal with after this weekend's race is the steering column issue I am having.  The popping and sudden alignment changes is still ongoing.  I checked the bracket bolts and they are fine.  It may be an internal thing, so I may need to get my spare rack and pinion and have it rebuilt.  We'll see.

Also, my clutch is starting to go it sounds like, but I'm hoping it will last till the end of the season.  It's just another thing to deal with.  Joy.

Not a terribly exciting post, I'm still not in my normal feel-good mental states.
Till next time...

Wednesday, 30 May 2012

Tiretail Continued...Mac and Tee.

In an effort to make transport easier for all my race stuff, I have designed and had fabricated a tiretail to haul my tires. 

In the previous installment I showed the concepts that were developed virtually before the actual fabrication.  As promised I said I would show pictures of the final product.

It works perfectly well.  The rear springs (which are heavy 600lbs) held the extra weight well.  I lost about an inch of travel in the rear shocks and I didn't bottom out over any undulatins in the road.

At highway speeds (I would not drive any faster than 100km/h) there was very little change in handling.  The only difference I felt was when making turns I could feel the extra weight swinging around.

For the days that it rains, I decided to fill the frame with expanding foam since I could not fully spray the inside with rubberized asphalt underspray.  This will plug all the holes so the frame doesn't start to rust from the inside.  I still have to clean it up a bit, but I didn't have time to do any sort of cleaning up of the foam before my race.

You can also see the new exhaust tip I decided to go with to deflect hot exhaust gases away from the tires.  Someone at the races asked, "What's with the macaroni exhaust?"  Now I shall dub this design...Mac and Tee.

Here are a few pictures of the fabricated tiretail.  Fully adjustable to accommodate anything up to 18" in diameter, and a width of 255...like I could ever or want anything that size anyways.


Until next time...

Thursday, 10 May 2012

And so the Season Starts...

The last couple of months has been interesting.  Getting the car ready for the Spring season has been a difficult process.  This was multiplied because I was needing to get the Sentra ready for a long distance road trip to Washington and then to Charlottesville, Virginia.  What usually is a 6 week process was cut down to 3 weeks. 

Changing struts and shocks, changing suspension setups, changing tires, going over all wear items, maintaining brake calipers, going over all the bolts to make sure they are torqued to spec, alignment, changing some of the fluids, and the list went on and on. Whew.

Overall it was a great trip(it always is, we've done this trip 3 times now), except for one snag.  I noticed when I got into Washington, my front tires were so worn on the inside they were basically slick.  In the garage of the hotel I lifted the car, put the camber to 0 and hoped that that was enough to get through the trip.

It wasn't.

One rainy day, as we were driving to some caverns in the Shanandoah I noticed the car was very, very, squirelly.  I don't mind a little squirelliness.  In fact, that is the way I like it best, with a little toe out on the front alignment.  This however, was almost impossible to control at highway speeds.  When we got off the exit and got to the Caverns, I checked the tires in the parking lot.

My stomach fell when I saw what I saw.  Both my front tires were completely corded on the inside 2 inches.  That incident completely ruined our day because I had to find a garage that would get the tires I needed and have them mounted.  This town had to have had a population of 500 at most, but by blind luck, I found a shop that could have some BFG G Force Sports in a 215-45-17 size delivered within a few hours.  So by 1pm we were on the road again heading back to our Bed and Breakfast without seeing the Caverns.  Oh well, maybe next time.

I realized that my alignment was a bit off and I added way too much toe out while getting the car ready for the season, so I scrubbed off my tires completely in 700 kms or so.  Live and learn I suppose.  This was going to be the last summer on these tires anyways.

Also, this year I decided that I was done with carrying my race tires in the car.  I can only fit 2 in my trunk, and 2 more have to go in the rear of the cabin right behind the front seats.  Plus, all of the other equipment and stuff I carry with me adds up to one full car. 
To make things easier, and faster I decided to design a tire tail to fit in my receiver hitch.  A tiretail is basically a trailer frame that has no wheels, and hangs out behind the car.  It's a lot of vertical weight for the hitch to carry so my receiver hitch needed a lttle reinforcing with 3/16" thick alluminum plates to be able to carry the weight and then some of the tires. 

As usual I worked with Wayne Yeates at Way's Performance Services.  Since he has so much knowledge about all things racing and all things about car stuff in general he was a perfect person go over my design and refine it.  Once we came up with a final structure in 3D Studio Max, I went to Metal Supermarkets to get the steel and alluminum tube, and had Wayne weld it up.  He did such a crazy good job, and he even added some details to make it even stronger.  He really is the best mechanic I have ever dealt with, he is defiantely a friend of mine.  Here are the tire tail designs starting from initial concept to what the final one.  I am still painting the final piece but once that is done I will post it up.

This first concept was a simple design however, it would have been too top heavy, and would probably rock around a lot. We figured it would have too much twisting going on as you drove with the full weight of the tires hanging up high on the cross bar. 


This second concept incorporated a straight frame to lower the centre of gravity. No jiggling here.  Once I did some calculation though I figured that this concept was much too heavy, and I knew I could come up with something that was a lot lighter.


The third concept was a variation of the second, except it was much lighter. This design incorporated an exhaust deflector in the front so I would not melt the tire right behind the exhaust.  After some research I found some people who arrived at the track with a melted tire, soI figured I didn't want to do that.  I was still not happy with the complexity of this concept so I knew I had to move on.


The fourth concept gets rid of the bulky side frame to keep the tires upright at all times.  The tires would be tied down with a rachet tie down strap. Easy. The exhaust deflector grew and spanned the entire length of the tiretail. This allowed me to use this thing with any car with a receiver hitch no matter what side the exhasut was on. But, the weight would have been too much so on to the next concept.  Also, it did not give me the flexibility if I decided to use wider tires.  This design was strictly for a 225 width tire only.


This was the fifth and final concept. It is similar to the previous version, except for a few exeptions.  I decided to use an adjustable system. This is just a 1" alluminum square tube that would be drilled and sleeved. The perpendicular steel frames would be drilled in 1" increments so if I decided to use wider tires, I could easily adjust the bars to accomodate the different sized tires.  I got rid of the exhaust deflector altogether, and decided I would just weld a 45 degree bent exhaust tip to the car's muffler to direct exhaust away. This was a simple solution in reducing a lot of weight from the tiretail.

I used more reinforcing supports and added some heavy L brackets on the bottom to be safe. I double walled the main middle frame tube using a 1.25" steel tube with a 1" square tube slid inside and welded, effectively doubling the wall thickness.


This was the assembly sheet for Wayne to follow so when he got the jumble of pre-cut metal tubes he knew what to do with them.  He added many of his touches to this design to strengthen it.  The final piece is so pretty. 


On a non racing note, my wife and I also decided to adopt a 3 year old pointer/lab dog.  And he has been a handful.  I don't have experience with a child, however, this can't be far off.  Bradley was a farm dog, and he has to be socialized.  He had heartworms as well so for the last 2 months he has not been allowed to socialize with dogs or get excited in any way, because elevating his heartrate can cause a worm or a piece of a worm to block an artery and if that happens in the brain then he could have a stroke.

Because of this lack of excercise, he has a tonne of pent up energy so controlling him has been a chore.  Plus we have 3 cats, so we are slowly trying to socialize him to them.  It has not been going well.  Imagine cat's flying across a room, and a dog tearing around trying to catch them, knocking everything over in the process.

We finally got his clean bill of health a few days ago, so training is intensive now.  Our trainer is amazing and it has been completely eye opening that there is hope that Bradley will be a good dog.  But the amount of physical and mental drainage is unbelieavable.  I'm sorry but, there is no way that a hyper 80 pound dog is easier than a child.  With a child, all you do is pick them up if you don't like what they are doing. That's not so easy with a strong 3 year old dog.  Plus as kids get older you can reason with them.  Good luck with that with a dog.  It's all about hours of training every day, and that is what we have to do.

On the way to pick Bradley up someone decided to make a right hand turn from the left hand lane. When I saw that they were making this move, and I was in their blindspot, I gassed it. They ended up turning into my rear left fender and bumper so I had to get that sorted out as well. She was very understanding and I got the money within a day. Still, this took out a lot of time to get the car prepared for the season though, and I had to do my Advanced Autoslalom school in a somewhat banged up car.

The autocross season has started now, and I can't wait to get onto the track again.  I had to miss the first race because Bradley had his final exam on the same day.  But, the next race there will be a Scion FRS there and I cannot wait to try it out.

As I stated earlier, I also went to the ILR Advanced Autoslalom School and it was a great experience.  It was a full day of classes and track time with racing instructors.  The head instructor is Ian Law who has a number of SoloI and SoloII championships.  I learned so much, even though I have had a many years of years competing. 

I decided to use my street tires for this and I do have to say, the BFG G Force Sports are not track tires, or even close to the BFG G Force KDW's I used to have.  They had good stick, and the sidewalls were stiff(not as stiff as the KDWs) but because the treadblocks are smaller they chunked like a S.O.B.  Well, another live and learn situation.

Anyways, the E-Crosser has been put on hold for a month or so more until things at home settle down.

Till next time.

Sunday, 4 March 2012

It's Splitsville...Part 2

It's been 2 weeks since the first prototype was vac-formed.  A lot of revisions had to be made for this version and my spare time was taken up doing this, but I think the results show how far this design has come.  I have made it double walled to add some rigidity to the piece, and also, it is about 1.25" shorter so it will not hit ground during some of the rougher portions of the track pavement.

There is also a 2.5" Lip around the entire mould to allow a lot more surface to attach the aluminum undertray to.  This undertray will be fabricated up by Wayne Yeates of Way's Performance Services.

I removed the 3 support ribs that were in the fron of the original version.  I figured that since there are support rods those should not be required.

This time I used Adobe Illustrator to create the template that I would be using to cut out the mould.  I made very precise measurements from the bumper, instead of just tracing around the bumper like I did the previous version.

I printed up the template, and layed the bumper over it and adjusted as needed.  I also, had to remember that ABS has a shrink rate of 3-8% so I averaged it out and brought down the template 5%.

Once the template was finalized I used a scroll saw to cut 3 layers of 3/4" MDF(Medium Density Fibreboard).   I screwed and PL Premiumed each layer so this thing is completely solid and should be around for hundreds of pulls.  This solid piece was then sanded to make 1-2 degrees of negative draft so it could be extracted easily from the ABS form.

The large horizontal splitter was cut using 1/4" HDF(High Density Fibreboard) and was only screwed into the Main MDF body with 4 screws.  I plan on this being replaceable as it is a thin piece and could snap when trying to eject it from the ABS.

During the test pull there were a couple of issues.  A vaccuum leak prevented the left and right rear corners to get completely sucked onto the mould.  This was a minor leak and everywhere else sucked nicely to the mould.  It looked pretty good other than that, almost like a final working piece.  Even the test fit to the bumper cover was almost perfect.

Also, releasing the mould was a very painful experience as it took about 15 minutes of banging on the finished test piece. the MDF body cracked a bit and will have to be repaired.

After examining the mould we discovered that their was actually a very slight positive draft on a couple of inches of the mould, which prevented it from being released from the the formed piece.  That will have to be sanded down to create some negative draft.

Also, after this last test, I am going to add alot more draft to the inside of the mould where you won't even see it when installed.  I will add 5-10 degrees just so it will be a very simple process of extracting the mould from the ABS final piece. 

Spraying the mould also with sandable primer on the next revision will be sanded sound to a "baby's bottom" smoothness level.  We couldn't use silicone spray on this mould since it was bare MDF and it would have just absorbed the silicone and caused it to swell or warp slightly.  So using the primer will seal the MDF and allow us to use the silicone spray which will create slippery surface so extraction will be even easier.

If only this test piece worked out, because, by accident, we used a piece of scrap ABS, thinking at first it was polystyrene.  Only after the test pull was complete we could smell that it was ABS.  Ah well.
Test Pull Rear-So Pretty.
Test Pull front
Test Fit Front-Perfect Fit!
Test Fit Rear

Also, I had to build some custom brackets that will hold the support rods from the splitter to the bumper.  U-Brackets are hard to find so I had to cut a Flat T-Bracket, and use a brake press to make the U-Brackets I needed.  It turned out pretty well.  The rest of the hardware will be from Brafasco as they have everything I need.  I've never been there and I'm quite excited aboutfoing to a showroom full of hardware.

So, hopefully, this coming week I will make all the revisions and repairs required on the mould and do 1 final test pull on the vacuum former.  Then it should be ready for the final piece with white 1/8" ABS.  Yes, I said white because the suppplier only had white and really, I could really care less what colour this thing is.  As long as it's functional, I will be super happy.  I can paint it black easily enough.

That's it from my end.  I'll update soon with the next version of this splitter.